Many of us play games, no matter how or where, even a little bit, but we do. And then one fine day comes when you go to App Store in search of a new game, click on the Top Chart button and see again the same runners and another variation of Angry Birds, but on such a topic that, it would seem difficult to imagine. And you wonder: why is there no such game that would do such and such actions, because it is so simple, and no one does anything like that.
And an idea comes to mind – a very daring idea. “And why not take, and make the game yourself? Yes, and it seems like you know Objective C, or own a simplified add-on in the form of Cocos 2D. Having made this decision, you are on a difficult, but incredibly interesting path.
And now, after many months of development, and perhaps just a week of that, you have a prototype of your future hit. And it seems like nothing slows down in the emulator and works perfectly. And then a question that is not particularly difficult to execute, but very important, comes to the surface – how to register your Apple ID in the iOS Developer Program? You go online and see … but you don't see anything concrete, only old tutorials, which have long since lost their conceivable and inconceivable relevance. But don't worry – today is the answer to the question “How to register?” will be given. Go!
So, in order to successfully register with the iOS Developer Program, you will need:
1) Desire
2) Plastic card Visa / MasterCard (or virtual)
3) Cash (at least $ 100)
4) Apple ID
If you have all of the above, do not read the next paragraph.
And if you do not have something, then let's go over all the listed items. So:

1) Well, of course, if there is no desire, then no one will force you;)

2) It's more interesting here. According to numerous reviews on the Internet, you only need a plastic card, no virtual ones are accepted. This is not the case (I argue from my experience). If you do not have a card, then you can open it at any bank, since there are a lot of offers. The main thing when opening is to clarify one point – namely, how your chosen bank relates to transferring money abroad and from abroad (we are going to receive money from Apple, right?).
And now about the virtual cards. The easiest way is QVC or Qiwi Visa Card. It is done in 2 clicks. In order to make such a virtual card, you need to create a Qiwi Visa Wallet. You can find out how to make a Qiwi Visa Card by following the link.
3) One hundred dollars is the minimum that must be on your card account for a successful purchase. Don't be stingy and put in a little more. Why? I'll talk about this further.
4) Well, everything is clear here too. The “nationality” of the account, by the way, is not important. And advice: it's better to enter the details of the card that you want to use for the purchase iOS Developer Program in the payment information. Next, I will explain why.
Well, it seems, we figured out all the points, and now let's move on to the main thing.
Registration in the program. Step 1
Money on the card, Internet to the full and go!
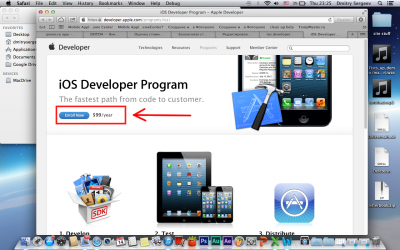
1) Follow the link
2) We are greeted by a friendly site Apple, specifically a subscription page, where you can read fascinating information about joining the program or simply admire the page design. At the very top left of it you will see a blue “Enroll” button. Press not on it.
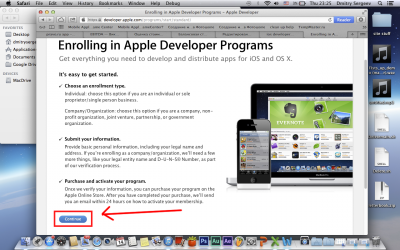
Registration in the program. Step 2.
Now we are on the “Advertising” page of the program, which lists all the advantages of joining. Scroll to the bottom and click “Continue”.
Registration in the program. Step 3.
Next, we are offered to either log in with an existing Apple ID, or create a new one. We select the first option and click on “Sign in with your Apple ID”
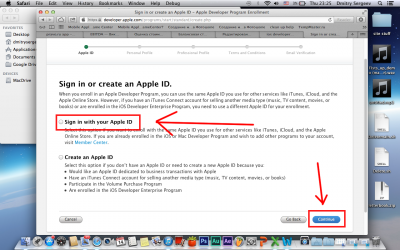
And then click “Continue”.
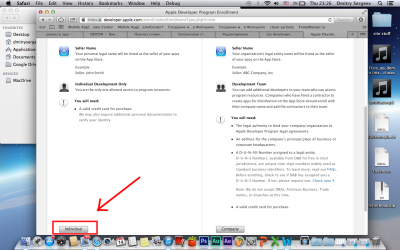
Registration in the program. Step 4
On this page we will be asked to choose whether you will register an individual account or a corporate one. Scroll to the bottom and select “Individual” on the left.
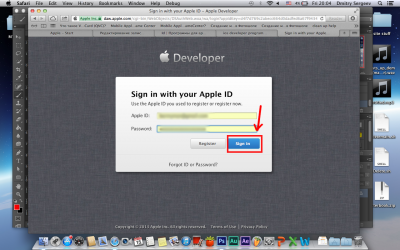
Registration in the program. Step 5
On the next page we will be asked to enter a Login and Password. Enter them and click “Continue”.
Registration in the program. Step 6
interesting 6.1-inch iPhone 12 and iPhone 12 Pros to ship first Apple ready to start production iPhone 12
We are now entering information. It's very simple – enter information clearly and without jokes. Everything is like on your plastic card (or how you entered your first / last name for the holder's details on the virtual one).
In the Title field, choose how to contact you (for example, Mr.),
in the First Name field – your name,
in the Middle Name field – the second name (if any),
in the Last Name field – Surname.

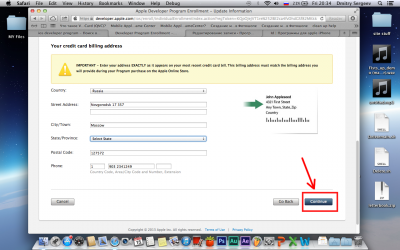
This was the first field to fill in the information. Next, we scroll below and enter the billing address, that is, again, the one that is attached to the card (and virtual too):
In the Country field – Russia,
in the Street Address field – address in the format Street, House number,
in the City / Town field – your city,
in the State / Province field – select again a city or region,
in the Postal Code field – the index,
in the Phone field – the phone number.
After entering all the data, at the very bottom right – “Continue”.
Registration in the program. Step 7
Here we will choose our program. Check the box next to “iOS Developer Program” and then click “Continue” at the very bottom right.

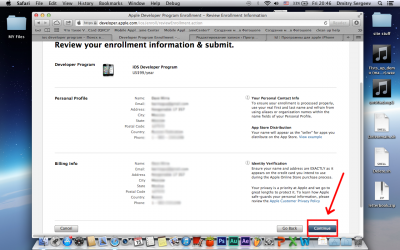
Registration in the program. Step 8
We check all the information and click on the bottom right “Continue”.
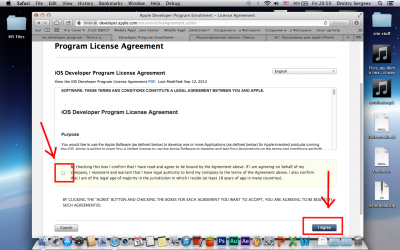
Registration in the program. Step 9
We will now be asked to agree to the user agreement. I can read those who wish, but we just put a tick next to the words that say that you agree with everything, and again – the lower right corner, that is, “Continue”.
Registration in the program. Step 10
Now it's the turn to enter billing information. Enter everything that is required of us, that is:
In the Type field – Visa,
in the Number field – the card number (for example 1234 5678 9087 7654),
in the Cardholder's Name field – the name of the card holder (for example IVAN IVANOV),
in the Expires field – the year when the card expires (for example, 2/15).
Next, in the area for entering the address, once again enter the address that is tied to the map. The points are the same.
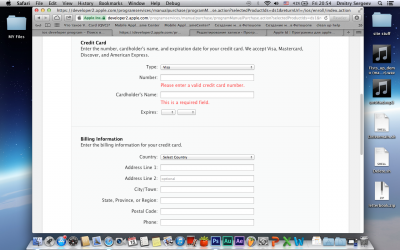
I would like to dwell separately on the payment data entry area. I mentioned above that it is better to have a little more than $ 100 on the card. Let me explain why: do you see a slight oddity in the billing columns?
Experienced cardholders will immediately notice: where is the CVV2 code entry field? And he is not, friends. How Apple was going to withdraw money?
Apple will withdraw money directly, and in order for the transaction to be successful, you need to make sure the bank is able to make such a payment. This is done by linking with the bank. Ask if the payment will go through without the CVV2 code. Now, in almost all banks, this is not a problem. The main thing is that all payment information is reliable.
What about virtual cards? In QVC, you can disable the security code, personally verified.
There is only one thing: Apple is considering your application for two days (and in fact 5 days), so you need to guess the moment, since the Qiwi service (in my case) responded to my request to disable the code only the next day and turned it off for 48 hours. So after you send a request to Qiwi, you can safely start attacking Apple with messages on the topic that the security code has already been disabled and that they need to hurry up with the transaction. Fortunately, the support from Apple is excellent and they will help you and most likely they will consider your application before priority.
Although it is not excellent in every way. If you have any question that concerns the transfer of money indirectly, then be prepared to receive not entirely intelligible answers and a bunch of frank “water” in messages.
So, after entering all the data, scroll to the bottom and press the blue “Continue” button in the bottom center.
Registration in the program. Step number “home stretch”
All! Now it remains to wait. And look, you see the line Enrollment ID? (For example HKQ746RD) – this is your enrollment code. Save it – you will need it when contacting support Apple to speed up communication with the latter.
Registration in the program. Step # “Last”
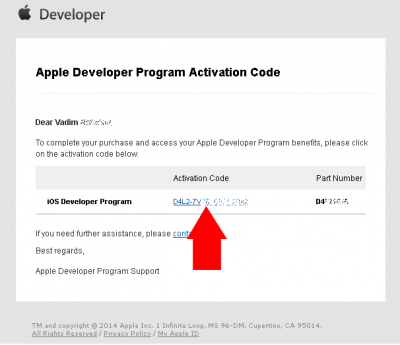
The withdrawal report will serve as a sign that the money transfer was successful. As soon as they are removed, then consider that all the problems are behind. You will receive an email with a developer account activation code.
Click on the “Activation Code” link and complete the activation process.
Now feel free to go to the Membership Center and, after entering the data Apple ID, you will be taken to an area closed to regular users. Generate keys, register keys .. In general – have fun! 🙂
P. S. If you have any questions, such as how to generate a certificate or add a device, you can always watch support videos in the “Help” section of the Membership Center.