Welcome to the third part of the tutorial in which we create a Mega Jump-style game with Sprite Kit and Swif t. In the previous part 1 and part 2, we created a Sprite Kit game called Uber Jump. We’ve added graphics, a hero sprite and some gameplay elements.
In Part 3, we will use this foundation to build the complet e level of the game, including the scoring system. We’ll also add accelerometer support so our ‘ultra jumper’ can move from side to side and up and down. When we are all done, y ou will have an absolutely complete game that you can then ex pand in different directions. Like the first parts of the tutorial, this material will require you to know the basics of the Sprite Kit. So, welcome to the next level!
Continuation
The original article in English is available here.
Download a complete copy of the project from the first part if you did not do it yourself .
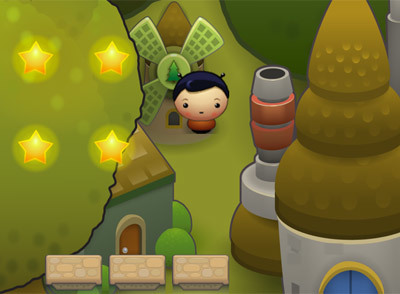
Our level will contain many star s and platform s . To avoid manually struct uring the data, download this level config file, then drag Level01.plist into your Xcode project. Make sure the “Destination: Copy items if needed” checkbox is checked and the UberJump target is selected.
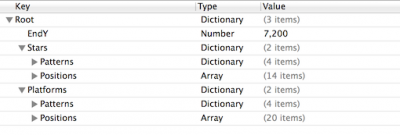
Open Level01.plist and examine its contents. It essentially consists of three elements:
– EndY determines the height that the hero must reach to complete the level.
– Stars determines the position of all stars in the level.
– Platforms defines the position of all platforms in the level.
Stars and Platforms contain two nested elements:
– Patterns contains a number of pattern s for stars and platforms.
– Positions defines the location of the star and platform patterns throughout the level.
For a better understanding of the file structure, open the Stars / Positions / Item 0 element. It contains three nested elements that contain information of the following content: the stars need to be placed crosswise at the point with coordinates 160 and 240.
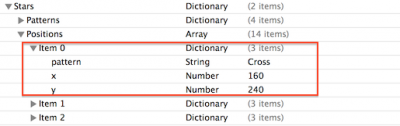
Now take a look at Patterns / Cross and you will see a pattern containing five elements, including the X and Y coordinates relative to the position given in Stars / Positions, and the type of star. Normal type is denoted by zero, and special type is denoted by one.

This is a fairly convenient way to reuse star and platform templates without having to set a position in code for each individual object.

Loading a level with data
To add the ability to load level parameters from the Level01.plist file, open GameScene.swift and add the following property to the class:
// Height at which level ends let endLevelY = 0 |
EndLevelY will store the height or ordinate that the player will have to reach in order to complete the level.
Paste the following code into the init (size 🙂 method, just before the lines that create and add the platform:
// Load the level let levelPlist = NSBundle .mainBundle ().pathForResource ("Level01" , ofType : "plist" ) let levelData = NSDictionary (contentsOfFile : levelPlist!)! // Height at which the player ends the level endLevelY = levelData[ "EndY" ] !.integerValue ! |
This code loads the data from the property list into a dictionary called levelData, and then takes the value of the EndY property from there and stores it in the endLevelY var iable.
Now let’s get into the stars and platforms. Let’s start with platforms: in the init (size 🙂 method, replace the following lines:
// Add a platform let platform = createPlatformAtPosition (CGPoint (x: 160, y: 320), ofType: .Normal ) foregroundNode.addChild (platform) |
with this code:
// Add the platforms let platforms = levelData["Platforms" ] as NSDictionary let platformPattern s = platforms["Patterns" ] as NSDictionary let platformPosition s = platforms["Positions" ] as [NSDictionary] for platformPosition in platformPositions { let patternX = platformPosition["x" ]? .floatValue let patternY = platformPosition["y" ]? .floatValue let pattern = platformPosition["pattern" ] as NSString // Look up the pattern let platformPattern = platformPatterns[pattern] as [NSDictionary] for platformPoint in platformPattern { let x = platformPoint["x"]? .floatValue let y = platformPoint["y"]? .floatValue let type = PlatformType (rawValue : platformPoint["type" ]!.integerValue) let positionX = CGFloat (x! + patternX!) let positionY = CGFloat(y! + patternY!) let platformNode = createPlatformAtPosition(CGPoint(x: positionX, y : positionY), ofType: type!) foregroundNode.addChild(platformNode) } } |
There is a lot going on here, but these things are pretty simple. We loaded the Platforms dictionary from levelData and then looped the platform positions from that dictionary. For each element, we got the appropriate template and instantiated a PlatformNode of the desired type with the given X and Y positions. Finally, we added all the platform nodes to the foreground node, which should contain all game objects.
Build and run. You will see a row of three horizontally aligned platforms that are of type “Triple” as defined in the file at Level01.plist.
Now do the same for the stars. Inside GameScene.swift, replace the following line in init (size :):
// Add a star let star = createStarAtPosition (CGPoint(x: 160, y: 220), ofType: .Special ) foregroundNode.addChild(star) |
code:
// Add the stars let stars = levelData["Stars" ] as NSDictionary let starPattern s = stars["Patterns"] as NSDictionary let starPosition s = stars["Positions"] as [NSDictionary] for starPosition in starPositions { let patternX = starPosition["x"]? .floatValue let patternY = starPosition["y"]? .floatValue let pattern = starPosition["pattern"] as NSString // Look up the pattern let starPattern = starPatterns[pattern] as [NSDictionary] for starPoint in starPattern { let x = starPoint["x"]? .floatValue let y = starPoint["y"]? .floatValue let type = StarType (rawValue: starPoint["type"]!.integerValue) let positionX = CGFloat(x! + patternX!) let positionY = CGFloat(y! + patternY!) let starNode = createStarAtPosition(CGPoint(x: positionX, y: positionY), ofType: type!) foregroundNode.addChild(starNode) } } |
Everything here is exactly the same as what we did when creating the platforms, but in this case we use the Stars dictionary instead of the Platforms dictionary.
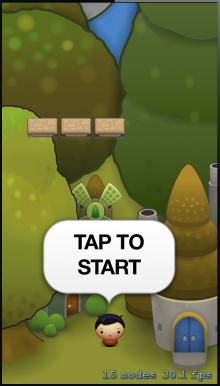
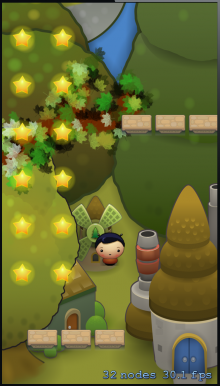
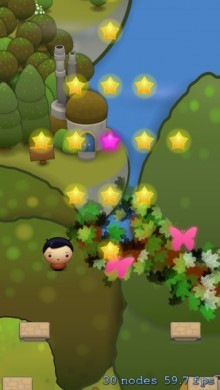
Build and run. It already looks like a real game!
Middle ground layer
Graphically, there is one more thing you can do to add the illusion of volume to the game – this is the middle layer. It will represent the node containing the scenery graphics.
Add the following method to GameScene.swift:
func createMidgroundNode () -> SKNode { // Create the node let theMidgroundNode = SKNode() var anchor : CGPoint! var xPosition : CGFloat! // 1 // Add some branches to the midground for index in 0...nine { var spriteName : String // 2 let r = arc4random () % 2 if r> 0 { spriteName = "BranchRight" anchor = CGPoint(x: 1.0 , y: 0.5 ) xPosition = self.size.width } else { spriteName = "BranchLeft" anchor = CGPoint(x: 0.0 , y: 0.5) xPosition = 0.0 } // 3 let branchNode = SKSpriteNode (imageNamed : spriteName) branchNode.anchorPoint = anchor branchNode.position = CGPoint(x: xPosition, y : 500.0 CGFloat(index)) theMidgroundNode.addChild (branchNode) } // Return the completed midground node return theMidgroundNode } |
Let’s take a closer look at this code:
1. We add ten branches to midgroundNode , spaced evenly throughout the level.
2. There are two different images: on one, branches grow from the left side of the screen, on the other – from the right. We take one random one.
3. We place the branches at intervals of 500 points along the y-axis at the midground node.
Now let’s add the middle ground node to the stage by inserting the following code into init (size :), right after the line that adds the background node:
// Midground midgroundNode = createMidgroundNode() addChild(midgroundNode) |
Build and run.
Look! Branches of various kinds appeared, and some even had pink butterflies!
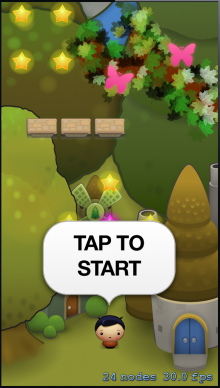
Note: pink butterflies appear if the random branch is the one drawn for the right side of the screen. The image for the left branch does not contain butterflies.
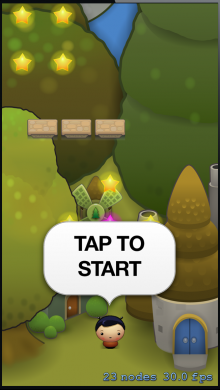
Click to start the game and you will see a hero sprite flying up the screen. However, when the ‘ultra jumper’ rises, the game world remains in place for now.
The foreground, middle and background layers must move with the hero node to keep the hero sprite centered on the screen. This is what we’re going to deal with in the next chapter.
Parallax
interesting 6.1-inch iPhone 12 and iPhone 12 Pro will go on sale first Subscription pack launch Apple One confirmed
To add parallax to our game, we will move the foreground, middle and background nodes at different speeds as the hero travels up and down the scene. The Sprite Kit calls the update () method on our scene every frame, so this is the place to implement the logic to ensure smooth animation.
Open GameScene.swift and add the following method:
override func update(currentTime : NSTimeInt erval ) { // Calculate player y offset if player.position .y > 200.0 { backgroundNode.position = CGPoint(x: 0.0, y: -((player.position.y - 200.0)/10)) midgroundNode.position = CGPoint(x: 0.0, y: -((player.position.y - 200.0)/4)) foregroundNode.position = CGPoint(x: 0.0, y: -(player.position.y - 200.0)) } } |
We check that the hero node has moved more than 200 dots across the screen, because otherwise we don’t want to move the background. If the condition is met, we move three nodes down at different speeds to create a parallax effect:
– Move the foreground node at the same speed as the hero’s node, actually preventing the hero from going out of the screen.
– Move the middle node at a speed equal to 25% of the hero’s node speed, because this layer should be farther from the viewer.
– Move the background node at a speed equal to 10% of the hero’s node speed, because it should be even further away.
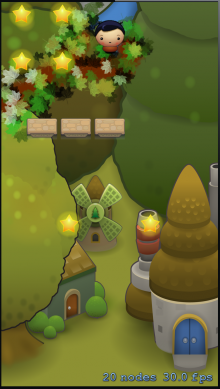
Build and run. Click to start the game. You will see that all the layers are now moving with the hero, and the different node speeds of the background and middle ground of the nodes produce a very nice parallax effect.
Great job! But it is too early to rest on our laurels. In order to jump to the stars, you must first dig the ground.
Motion with an accelerometer
It’s time to use the accelerometer. The movement along the vertical axis is fine, but what about the movement along the horizontal axis? Just like in Mega Jump, the user will control his ‘ultra jumper’ using the accelerometer.
Note: To test the accelerometer, you will need to run the game on a real device. iPhone Simulator does not work with accelerometer.
You will need the Core Motion library to handle the accelerometer input signals, so add the following line at the top of GameScene.swift:
import CoreMotion
|
Then add the following properties to the GameScene class:
// Motion manager for accelerometer let motionManager : CMMotionManager = CMMotionManager() // Acceleration value from accelerometer var xAcceleration : CGFloat = 0.0 |
We are going to use the MotionManager to access the device’s accelerometer data, and we will also store the last calculated acceleration value in the xAcceleration variable, which we will need later when setting the speed of the hero node along the X axis.
To create a CMMotionManager instance , add the following code to the init (size 🙂 method right after the line that adds tapToStartNode to the HUD:
// CoreMotion // 1 motionManager.accelerometerUpdateInterval = 0.2 // 2 motionManager.startAccelerometerUpdatesToQueue (NSOperationQueue .currentQueue (), withHandler : { (accelerometerData : CMAccelerometerData !, error : NSError !) in // 3 let acceleration = accelerometerData.acceleration // 4 self.xAcceleration = (CGFloat(acceleration.x ) 0.75 ) + (self.xAcceleration 0.25 ) }) |
There’s a lot going on here, so let’s dive deeper:
1. The accelerometerUpdateInterval property determines the number of seconds between updates to the accelerometer values. A value of 0.2 provides the smoothest refresh rate.
2. We run the accelerometer and set a block of code to execute during each update of the accelerometer values.
3. Inside the block, we get information related to acceleration from the last accelerometer data passed to the block.
4. Here we calculate the acceleration of the hero node along the X axis. You can get this value directly from the accelerometer data, but the movement will be much smoother if you use a value by adding three quarters of the accelerometer acceleration along the X axis and one quarter of the current acceleration along the same axis.
Now that we have the abscissa acceleration value, we can use it to set the horizontal speed of the hero node.
Since you will directly control the speed of the hero node, it is important that Sprite Kit handles physics first.
The Sprite Kit has a method called didSimulatePhysics which is fine for this purpose. Sprite Kit will also call this method once per frame after the physics has been rendered and executed.
Add the following method to GameScene.swift:
override func didSimulatePhysics() { // 1 // Set velocity based on x-axis acceleration player.physicsBody ? .velocity = CGVector (dx : xAcceleration 400.0 , dy : player.physicsBody!.velocity.dy ) // 2 // Check x bounds if player.position.x < -20.0 { player.position = CGPoint(x: self.size.width + 20.0, y: player.position.y) } else if (player.position.x> self.size.width + 20.0) { player.position = CGPoint(x: -20.0, y: player.position.y) } } |
Several things are happening here:
1. We change the horizontal component of the speed value of the hero node using the xAcceleration value. Then we multiply it by 400, because the scale of the accelerometer does not correspond to the scale of real physics and, increasing the value, we get a more realistic effect. We leave the Y-axis value unchanged, because the accelerometer does not affect it in any way.
2. In Mega Jump, when the hero leaves the screen to the left or right, he then returns from the opposite side. We use the same behavior here, checking the screen borders and leaving the 20 point border off the screen.
Build and run on your device. Use the accelerometer to raise the hero sprite as high as you can!
Scoring system
Overall, our Uber Jump game will include three types of hero-related information:
1. Current account. The score will start from scratch. The higher the hero gets, the more points are added to your score. You will also receive points for each star you collect.
2. Highest score. There will always be final points at the end of each game loop. Uber Jump will write the highest values to the user defaults file so that the player knows the records to be broken.
3. Stars. Unlike the current score, which will be reset at the beginning of each game, the hero’s stars will accumulate from game to game. In a future version of Uber Jump, you can transform stars into a special game currency for which users will be able to purchase upgrades and additional options. We will not do this in the framework of the current lesson, but we will add such an opportunity in case you want to do it at your discretion.
We’re going to keep a running score, highest score and collected stars in a singleton class called GameState . This class in turn will write the highest score and the number of stars to a file on the device so that the values are stored between game launches.
Create a new iOS / Source / Swift File named GameState. Add the following class and property description to GameState.swift:
class GameState { var score: Int var highScore : Int var stars: Int class var sharedInstance : GameState { struct Singleton { static let instance = GameState() } return Singleton.instance } } |
The given three properties will provide access to the current score, the highest score and the number of stars. The sharedInstance class variable will give access to a single instance of the GameState class.
We also need a method to initialize GameState, which will zero out the current score, as well as load the highest score (if any) and the number of stars from the user settings file.
Add the following initialization method for GameState.swift:
init() { // Init score = 0 highScore = 0 stars = 0 // Load game state let defaults = NSUserDefaults .standardUserDefaults () highScore = defaults.integerForKey ("highScore" ) stars = defaults.integerForKey("stars" ) } |
Using the NSUserDefaults class is an easy way to store a small amount of data on a device. It is for user preferences, but in this example, it is used to store the highest score and number of stars. In a real application, you most likely want to use something more reliable than NSUserDefaults so that no one can easily change the data stored there and write more stars for himself than he earned!
Note: For more information on storing game data, see the How to Save your Game Data tutorial.
We need a method in GameState to store the given values. Add the following method to GameState.swift:
func saveState () { // Update highScore if the current score is greater highScore = max (score, highScore ) // Store in user defaults let defaults = NSUserDefaults.standardUserDefaults() defaults.setInteger (highScore, forKey : "highScore") defaults.setInteger(stars, forKey : "stars") NSUserDefaults.standardUserDefaults().synchronize () } |
Here is the GameState class that syncs with the storage on the device.
We got an almost working project, in the next final part, we will bring everything to mind and get a real game application!