Making a mega popular game for iOS is a snap, and we’ll prove it in this tutorial series : ). With this article, we begin a series of articles on creating a game for iPhone.
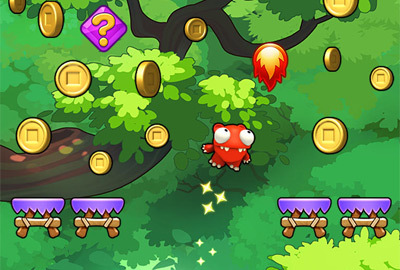
We’ll be using Sprite Kit and Swift on a hobbyist level to create something like Mega Jump. This is a fairly popular arcade-style vertical jumping game. Doodle Jump can also be called its analogue. The video below shows how the gameplay looks on the device …
As we build the game, y ou will learn how to use Sprite Kit’s features such as collision detection, accelerometer control, scene transitions. If you are complet ely new to the Sprite Kit engine, you can check out Ray’s Sprite Kit Tutorial for Beginners before starting this tutorial series. But if you are confident in yourself , then go ahead!
The original article in English can be found here.
Note: You will need a paid developer account to play. And if you intend to use this lesson to the fullest, then so is the device for testing.
Start
We’re going to make a game like Mega Jump. As the famous proverb says: “As you name a yacht, so it will float.” For a game to become truly bright, it must have a bright, memorable name.
“Uber” is even better than “mega”, so let’s call it “Uber Jump” :).
In fact, a game in the spirit of Mega Jump is a physical game: the main character is thrown up the screen and from that moment he must fight gravity in order to hold out as long as possible.
As the hero collects coins, he climbs higher and higher, and platforms provide a temporary respite on his way. Our Uber Jump game will have the same model: first we will throw our character up, and then we will apply constant gravity to him. On his way, he will collect stars that will help him climb up, being responsible for movement along the Y axis. If you miss too many stars, then the hero will inevitably fall down.
The accelerometer will control the player ‘s movement along the X-axis. By tilting the device to the right or left, you can set the direction of the hero’s movement horizontally.
The result will consist of a dynamic component (since you will be applying two forces to the player), as well as a kinematic component (since you will directly change its speed). So you won’t be bored!
First you need to create a new Xcode project with the Sprite Kit engine. Launch Xcode, select File \ New \ Project, then IOS \ Application \ SpriteKit Game template, and click Next.

In the field with the product name, enter UberJump, select Swift as the language, enter iPhone in the device tab, and then click the “Next” button.

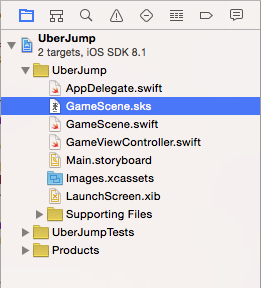
Select a location to store the project and click the “Create” button. Before we get down to business, there are some preliminary settings that need to be made. Find the GameScene .sks file in the navigator. We will not need it, so select it and click the “Delete” button. When the alert window appears, click “Move to Trash”.
Now open GameViewController.swift and remove the unarchiveFromFile SKNode extension at the top of the file as we won’t need any extraneous code. Then replace the viewDidLoad method with the following:
override func viewDidLoad() { super .view DidLoad () let skView = self.view as SKView skView.showsFPS = true skView.showsNodeCount = true let scene = GameScene(size : skView.bounds.size ) scene.scaleMode = .AspectFit skView.presentScene (scene) } |
Click Build, then Run to make sure everything works for now.
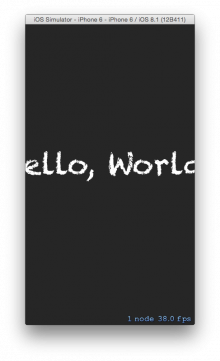
Don’t worry about the “Hello, World” text label being truncated. You can find it in the GameScene.swift file and replace it with what you need. But first you need to do the last thing to set up. Since our game will use an accelerometer, we need to make sure that rotating the device does not switch the application to landscape mode.
In the Xcode navigator (where your project is currently selected) select UberJump, go to the General tab in the settings and find the Deployment Info section. Make sure the portrait orientation is the only one available for the device.

We’ve prepared the project to start adding game components. Let’s start with the pictures.
Importing graphics
Download graphic resources (download link at the end of the article) for this project and drag and drop them into Xcode. Make sure “Destination: Copy items if needed” and UberJump are selected.
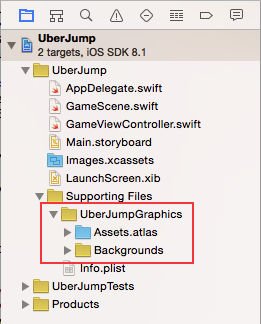
Illustrations are divided into background (Backgrounds folder) and game (Assets.atlas folder). Background tiles are tiles that will flip up and down the screen as the hero moves:

Game sprite s include all sprites, in particular character, plates and stars.

In order to improve efficiency, game resources should be stored in a texture atlas. You can learn more about texture atlases in the Sprite Kit in this tutorial.
Building the scene
You may have noticed that the GameScene class has already been created in the project template. It is the Sprite Kit scene that currently displays the “Hello, World!” when starting the game. Most of the Uber Jump action will take place here, so open the GameScene.swift class and replace the content with the following:
import SpriteKit class GameScene: SKScene { required init ? (coder aDecoder : NSCoder ) { super.init(coder: aDecoder) } override init(size: CGSize ) { super.init(size: size) backgroundColor = SKColor.whiteColor () } } |
Click Build and Run. GameScene now displays nothing more than a white screen. This is a blank canvas on which we will add the main objects of the game. Mega Jump uses the parallax effect of layers to produce realistic volume rendering. For example, foreground objects move faster than background objects. In Uber Jump, we’re going to do the same effect by creating the following layers in the scene:
– Background: a slow motion layer depicting a distant landscape.
– Midground: Faster tree branch decoration.
– Foreground: a fast moving layer containing the character, stars and platforms that form the core of the gameplay.
– HUD: top layer that doesn’t move and displays scoring labels.
The background node is the first one to add. Open GameScene.swift and add the following method:
func createBackgroundNode () -> SKNode { // 1 // Create the node let backgroundNode = SKNode() let ySpacing = 64.0 scaleFactor // 2 // Go through images until the entire background is built for index in 0...nineteen { // 3 let node = SKSpriteNode (imageNamed :String (format : "Background% 02d" , index + 1)) // 4 node.setScale (scaleFactor) node.anchorPoint = CGPoint (x: 0.5 , y: 0.0 ) node.position = CGPoint(x: self.size.width / 2, y: ySpacing CGFloat (index)) //five backgroundNode.addChild (node) } // 6 // Return the completed background node return backgroundNode } |
Let’s take a closer look at what we are doing here:
1. First, we create a new instance of SKNode. It has no visual content, but is positioned on the stage. This means that we can move it anywhere and its children will move with it.
interesting 6.1-inch iPhone 12 and iPhone 12 Pro will go on sale first Apple will announce the launch of iPhone 12 from day to day
2. We have 20 background images that need to be arranged in a row to fill the background.
3. Each child node is inherited from SKSpriteNode with the addition of a corresponding background image loaded from our resources.
4. Shifting the anchor point of each node to its lower center allows the nodes to be easily stacked on top of each other.
5. We add each child node to the background node.
6. Finally, We return the background node.
Now is the time to place the background node on the stage. In GameScene.swift add the following properties:
// Layered Nodes let backgroundNode = SKNode() let midgroundNode = SKNode() let foregroundNode = SKNode() let hudNode = SKNode() // To Accommodate iPhone 6 let scaleFactor: CGFloat = 0.0 |
We are adding properties for each of the nodes that will be used in the game. For now, we only need the background node, but it doesn’t hurt to declare other nodes as well.
We can also add the scaleFactor property. This is necessary so that the graphics are correctly scaled and positioned on all models iPhone.
To add a background to the scene, insert the following code into the init (size 🙂 method of the GameScene.swift class, right after the line that sets the background color:
scaleFactor = self.size.width / 320.0 // Create the game nodes // Background backgroundNode = createBackgroundNode() addChild(backgroundNode) |
The graphics are designed to fit a standard 320 pixel wide screen that most models have iPhone. Therefore, a scale factor is used here to adapt to other screen sizes. After initializing the background node, all we need to do is add it as a child to the current scene.
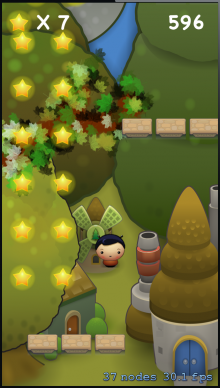
Click Build and Run to make sure that our background node appears on stage as shown below:
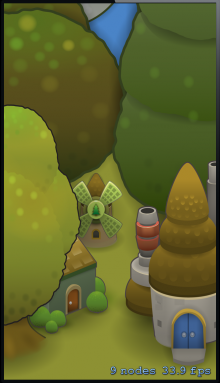
Note: Even though we have added 20 children to the background node, you will see that when you launch the application on a 4-inch device, only nine nodes are displayed on the scene. And with a 3.5-inch screen – only eight. The Sprite Kit is pretty advanced and only displays the nodes that should be visible in the game at the moment.
Adding a player node (Node)
It’s time to release our “Super Jumper” onto the stage. In GameScene.swift, add the following method:
func createPlayer () -> SKNode { let playerNode = SKNode() playerNode.position = CGPoint(x: self.size.width / 2, y: 80.0 ) let sprite = SKSpriteNode(imageNamed: "Player" ) playerNode.addChild (sprite) return playerNode } |
In the same way as we added a background node, an SKNode is created and an SKSpriteNode containing the player’s sprite is added to it as a child. Place the player’s node so that it is in the center of the screen horizontally and just above the bottom of the scene. Before adding the player node to the scene, you need to create a foreground. As discussed above, the foreground node will contain the player, stars, and platforms. This means that when we move it, then all game elements will move with it.
Paste the following code into the init (size 🙂 method right after the line that adds the backgroundNode to the stage:
// Foreground foregroundNode = SKNode() addChild(foregroundNode) |
Now that we have a foreground node for our gameplay elements, we can add a player node to it. At the top of GameScene.swift, declare the following property:
// Player let player = SKNode() |
Now place the player node on the stage by inserting the following code in init (size 🙂 right after the line that adds the foregroundNode to the stage:
// Add the player player = createPlayer() foregroundNode.addChild (player) |
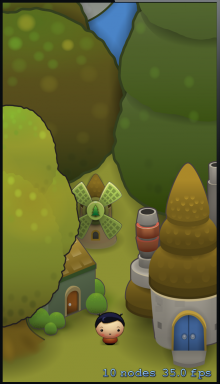
Build and Run (Build and Run) to see the Super Jumper ready to start the adventure:
Adding gravity and physical body
Our hero looks too relaxed. It would be nice to add physics to the game and see what happens. Let’s start with the fact that the physics of our game is inconceivable without gravity. In GameScene.swift, add the following line to init (size 🙂 right after the line that sets the background color:
// Add some gravity physicsWorld.gravity = CGVector (dx : 0.0, dy : -2.0 ) |
By doing this, you add a gravity vector to the physical world based on the plot of the game. Gravity is not projected onto the X-axis; it produces a downward force along the Y-axis.
Build and run to see how gravity will affect the player’s node.

Hmm … nothing happened. Why does your hero care about gravity? Try to figure it out for yourself before looking at the answer.
Answer:
The force generated by gravity has a dynamic effect only on the physical bodies of the scene. And objects of the SKNode class, such as the player’s node of our player, do not have physical bodies set by default. Therefore, we need to assign a physical body to the player node. At the end of the createPlayer method, add the following code before the return statement:
// 1 playerNode.physicsBody = SKPhysicsBody (circleOfRadius : sprite.size.width / 2) // 2 playerNode.physicsBody? .dynamic = true // 3 playerNode.physicsBody? .allowsRotation = false // 4 playerNode.physicsBody? .restitution = 1.0 playerNode.physicsBody? .friction = 0.0 playerNode.physicsBody? .angularDamping = 0.0 playerNode.physicsBody? .linearDamping = 0.0 |
The above code sets the physical body for the player node. Let’s take a closer look at it:
1. Each physical body must have a shape that the physics engine can use to detect collisions. The most convenient body shape to use in collision detection is a circle (it’s easy to tell when circles are overlapping) and, moreover, a circle works very well for your player’s knot. Its radius is half the width of the sprite.
2. Physical bodies are subdivided into static and dynamic. Dynamic bodies are under the influence of the physics engine and therefore depend on forces and impulses. Static bodies are not affected, but we can still use them for collision detection. For example, a static body such as a wall or solid platform will never move, but other objects can crash into it. Since we want our player’s node to be under gravity, set its dynamic property to true.
3. It is necessary for the node of our player to remain always in a vertical position, so we disable the rotation of the node.
4. Since we independently handle collisions in this game, we set the parameters of the physical body of the player’s node so that there is no friction or damping. However, we set its restitution property to 1 to prevent the physical body from losing some of its momentum during collisions.
Build and run to see the player’s sprite fall to the bottom of the screen as gravity pulls it mercilessly towards the center of the Earth.

It may sound a little melodramatic, but how is our hero going to find his place in this world?
Continued in a week ….
Download graphic resources for the lesson.