We are continuing the tutorial on creating a game for iPhone on Sprite Kit and Swif t. In the first part, we managed to create a game scene on which our hero is located, and even make him obey the laws of gravity. In this lesson we will teach the mountain to interact with the outside world, catch “star s” and bounce on platform s …
“Click to start”
The original article in English can be read here.
Now that gravity is working in the game, y ou need to make the physical body of the hero motionless until the user decides to start the game. Inside the GameScene .swift file, find the line in the createPlayer method that sets the dynamic property to the physical body of the player Node object. Change its value to false , as shown here:
playerNode.physicsBody? .dynamic = false |
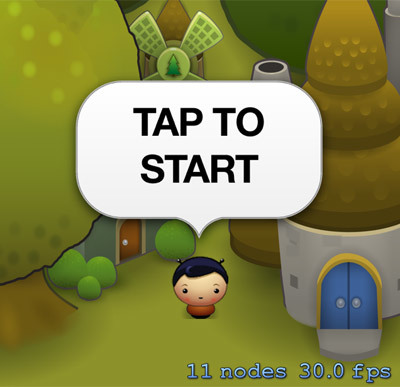
We’re going to write a code that will allow the user to start the game by clicking on the screen. And he must be warned about this with some kind of inscription. For ex ample: “Tap to start”. Let’s put this instruct ion on the screen.
Since the instructions will be in the HUD layer, create it first. In the init (size 🙂 method, right after where you added the foreground node to the stage, paste the following code:
// HUD hudNode = SKNode () addChild (hudNode) |
Graphic assets include an image that you need to click to start the game. So add the following var iable to the properties at the top of GameScene.swift:
// Tap To Star t node let tapToStartNode = SKSpriteNode (imageNamed : "TapToStart" ) |
To display the newly created node, add the following code to the init (size 🙂 method just after the line that adds the hero node:
// Tap to Start tapToStartNode.position = CGPoint (x: self .size.width / 2, y: 180.0 ) hudNode.addChild (tapToStartNode) |
Build and run to see “Tap to start” just above the hero sprite :

To handle touches and start playing, add the following method to the GameScene.swift class:
override func touchesBegan (touches: NSSet , withEvent event : UIEvent ) { // 1 // If we're already playing, ignore touches if player.physicsBody !.dynamic { return } // 2 // Remove the Tap to Start node tapToStartNode.removeFromParent () // 3 // Start the player by putting them into the physics simulation player.physicsBody? .dynamic = true // 4 player.physicsBody? .applyImpulse (CGVector (dx : 0.0, dy : 20.0 )) } |
Let’s take a closer look at this method:
1. We need to make sure the hero node is dynamic. If so, then simply ignore the touch event.
2. Remove the node labeled “Tap to start”.
3. We make the physical body of the hero’s node dynamic so that the physics engine can influence it.
4. We inform the hero’s node of the initial upward impulse so that it starts moving.
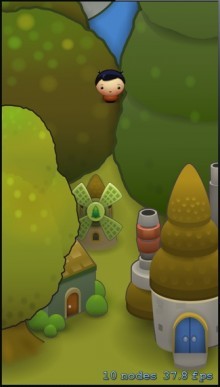
Build and run. When you click on the screen, the inscription ‘Tab to start’ will disappear, and the hero’s sprite will be thrown up, but not for long – gravity takes its toll.
Game objects: reach for the stars!
To give your character something to do other than just jump up, it’s time to add stars. Stars play an import ant role in Uber Jump: they must be collected by the player to go to the next level.
To get started, you just need to create one star in the game and make it fully function, and in the next part of the lesson we will complete the entire level.
According to the scenario of the game Uber Jump, like Mega Jump, when the hero’s sprite rises a certain distance above the star, platform or any other object, this object is removed from the scene. Since nodes and stars and platforms both meet this condition, it makes sense to subclass SKNode for all game objects.
Create a new Cocoa Touch Class named GameObjectNode and subclass SKNode. Make sure Swift is installed as the language.

The GameObjectNode class will include the following functionality:
1. Removing from the scene the object from which the hero’s node moved away at a distance greater than the specified one.
2. Detecting collisions between the hero node and the object. This method will return a boolean value that will notify if the hero has intersected with any object in the game, which will lead to the need to update the HUD layer. For example, if the player scored points.
Replace the code in GameObjectNode.swift with the following:
import SpriteKit class GameObjectNode: SKNode { func collisionWithPlayer (player: SKNode) -> Bool { return false } func checkNodeRemoval (playerY : CGFloat ) { if playerY> self.position.y + 300.0 { self.removeFromParent() } } } |
We call the collisionWithPlayer method whenever the hero node collides with an object, and we also call checkNodeRemoval every frame so that we can immediately remove the unnecessary node from the scene.
In the GameObjectNode class, the collisionWithPlayer method is just a stub. We will define the complete method separately in each of the subclasses that will be created for your game objects.
The checkNodeRemoval method checks if the hero’s node has moved more than 300 points from this node. If so, the method removes the node from its parent and thus removes it from the scene.
Star class
Now that we have a base class for the game’s interactive nodes, we can create a class for the stars. To keep things simple, let’s add all GameObjectNode subclasses at once to the GameObjectNode.swift file. Add the following code after the GameObjectNode class.
class StarNode : GameObjectNode { override func collisionWithPlayer(player: SKNode) -> Bool { // Boost the player up player.physicsBody? .velocity = CGVector(dx: player.physicsBody!.velocity.dx, dy : 400.0 ) // Remove this Star self.removeFromParent() // The HUD needs updating to show the new stars and score return true } } |
Colliding with a star throws the hero’s node up on the ordinate. You might ask, “why don’t we use the force or momentum of the physics engine to do this?”
If we used force or impulse, the desired effect would not always be there. For example, if a hero’s node moves down the screen and crashes into a star, then the force of influence on the hero will be much less than when he moves up.
The following diagram illustrates this very clearly:
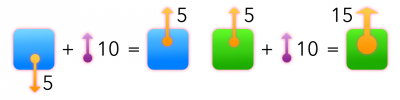
The solution to this problem is to directly change the speed of the player’s node. As you know, the velocity vector is composed of horizontal and vertical components.
The X-axis speed should not change, as it is only affected by the accelerometer, which we will implement later. In the above method, upon collision, we set the vertical projection speed to a fixed value of 400. So that the collision has the same consequences regardless of what the player did before colliding with the star.
Open GameScene.swift and add the following method:
func createStarAtPosition (position: CGPoint) -> StarNode { // 1 let node = StarNode() let thePosition = CGPoint(x: position.x scaleFactor, y : position.y) node.position = thePosition node.name = "NODE_STAR" // 2 var sprite: SKSpriteNode sprite = SKSpriteNode(imageNamed: "Star" ) node.addChild (sprite) // 3 node.physicsBody = SKPhysicsBody (circleOfRadius : sprite.size .width / 2) // 4 node.physicsBody? .dynamic = false return node } |
The code above should be familiar to you by now:
1. We create an instance of the StarNode class and set its position.
2. Next, add the star graphics using SKSpriteNode.
3. Add to the node a physical body in the shape of a circle, which we need to detect collisions with other objects in the game.
4. Finally, we make the physical body static because we don’t want gravity or any other physical simulation to affect the stars.
Now add the following code to the init (size 🙂 method, just before where we created the hero node. We want the stars to be behind the player, but also on the foreground node, so we need to add them before the player’s node.
// Add a star let star = createStarAtPosition(CGPoint(x: 160, y: 220)) foregroundNode.addChild (star) |
Build and run the game. Click on the start button and watch the hero sprite collide with the star.
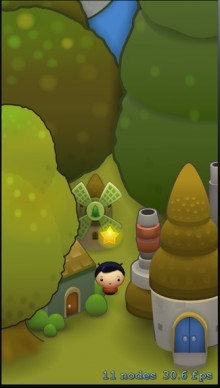
Our Ulta the jumper hit his head on the star. It didn’t go according to plan! Why do you think this happened? Try to guess.
And here’s the solution:
The physics engine handles collisions between the hero and the star nodes. The physical body of the hero node intersects the physical body of the star node, which is static and therefore motionless. The star node stops the movement of the player’s node.
Collision detection and bit masks
To detect collisions between the hero and the star nodes, we need to receive the collision event and call the collisionWithPlayer method of the GameObjectNode class.
Now is the time to take a look at the intersection of bitmasks in the Sprite Kit.
There are three bitmask-related properties for communicating collision information to physical bodies that you can use to determine how the physical body interacts with other physics bodies in the game.
1.categoryBitMask defines the collision category to which the physical body belongs.
2. collisionBitMask sets the collision category of the bodies with which the given body will intersect. Here the word “intersect” means that the objects will exactly collide with each other. For example, when playing as a third person shooter, you will need the hero’s sprite to collide with enemy sprites, but pass through the sprites of other players.
3. contact TestBitMask tells the Sprite Kit engine to notify you when a given physical body comes into contact with physical bodies belonging to one of the categories you specified. For example, in our game, we want the Sprite Kit to tell us when a player’s sprite touches a star or platform. By using the correct combinations of settings for contactTestBitMask and collisionBitMask, you can program the Sprite Kit so that objects pass through each other, and it notifies you when this happens. This way we can trigger events.
The first thing to do is set your categories. Open GameObjectNode.swift and add the following structure above the class definitions:
struct CollisionCategoryBitmask { static let Player: UInt 32 = 0x00 static let Star: UInt32 = 0x01 static let Platform : UInt32 = 0x02 } |
Return to GameScene.swift. To set the hero’s behavior during collisions, add the following code to the bottom of the createPlayer method, just before the return statement:
// 1 playerNode.physicsBody? .usesPreciseCollisionDetection = true // 2 playerNode.physicsBody? .categoryBitMask = CollisionCategoryBitmask.Player // 3 playerNode.physicsBody? .collisionBitMask = 0 // 4 playerNode.physicsBody? .contactTestBitMask = CollisionCategoryBitmask.Star | CollisionCategoryBitmask.Platform |
Let’s take a closer look at this block of code:
interesting 6.1-inch iPhone 12 and iPhone 12 Pro will go on sale first Apple will announce the launch of iPhone 12 from day to day
1. Since this is a fast moving game, Sprite Kit must use accurate collision detection for the physical body of the hero node. After all, the entire plot of Uber Jump is built on these collisions. Therefore, we need them to be captured as accurately as possible! (several cpu cycles will be involved)
2. We assign a category to the physical body bit mask. It belongs to the CollisionCategoryPlayer category.
3. By setting collisionBitMask to zero, we tell the Sprite Kit that we don’t want it to simulate any collision of the player node. This is because we are going to handle these collisions ourselves!
4. We tell Sprite Kit that we want to be notified when a hero node touches any stars or platforms.
Now let’s set up the star node. Add the following code at the bottom of the createStarAtPosition method, before the return statement:
node.physicsBody? .categoryBitMask = CollisionCategoryBitmask.Star node.physicsBody? .CollisionBitMask = 0 |
Everything here is similar to setting up a hero node. We assign the star category and set the collisionBitMask property to zero so it won’t collide with anything. However, we are not assigning contactTestBitMask here, which means Sprite Kit will not notify us when any object touches the star. After all, we have already instructed Sprite Kit to send notifications when the hero touches a star, and besides the star, he will not touch anything, so there is no need to send notifications from the star.
Sprite Kit sends contact notifications for the nodes we selected by calling the didBeginContact method of the SKPhysicsContact Delegate delegate. Set the scene itself as the physical world delegate by adding the SKPhysicsContactDelegate protocol to the GameScene class definition. It should look something like this:
class GameScene: SKScene , SKPhysicsContactDelegate { // Layered Nodes ... |
Now, make the scene a delegate to receive contact notifications by adding the following line to init (size :), right after the line that sets gravity:
// Set contact delegate physicsWorld.contactDelegate = self |
Finally, add the following method to GameScene.swift to handle collision events:
func didBeginContact(contact: SKPhysicsContact) { // 1 var updateHUD = false // 2 let whichNode = (contact.bodyA.node ! = player) ? contact.bodyA.node : contact.bodyB.node let other = whichNode as GameObjectNode // 3 updateHUD = other.collisionWithPlayer (player) // Update the HUD if necessary if updateHUD { // 4 TODO: Update HUD in Part 2 } } |
Let’s take a closer look at this code:
1. We are initializing the updateHUD flag, which we will use at the end of the method to update the HUD during these collisions and calculate the score.
2. SKPhysicsContact does not guarantee which physical body will act as bodyA and which will act as bodyB. But we know that all collisions in this game will be between the hero node and the GameObjectNode. Therefore, this line determines which one is not a hero node.
3. After we have determined which object is not a hero node, we call the collisionWithPlayer: method in the GameObjectNode class.
4. Here we update the HUD if required. We will do the HUD implementation in the second part of the lesson, so there is nothing here except for a comment.
Build and run the game. Click to start. Upon collision, the star throws the hero’s sprite to a certain height, and then is removed from the scene. Good job!
Well, a lot of hard work has been done! Let’s take a well-deserved break. In the next section, we are going to add new type s of uber stars, as well as a sound effect.
Note: If you would like to learn more about pin and collision detection in the Sprite Kit, check out “iOS Games by Tutorials” which contains three large chapters on engine physics.
Several types of stars
Uber Jump will contain two types of stars: those that add one point and special stars that add five points at once. Each star will have its own graphics. The collection in the StarNode class will help us identify the type of star.
Add the following collection to the top of GameObjectNode.swift:
enum StarType : Int { case Normal = 0 case Special } |
To store the star type, add the following property to the top of the StarNode class:
var starType : StarType! |
Now, when creating a star, we will need to specify its type, so in GameScene.swift add the starType parameter to the signature of the createStarAtPosition: method so that it looks like this:
func createStarAtPosition(position: CGPoint, ofType type : StarType) -> StarNode { |
Inside createStarAtPosition (position: ofType :), replace the three lines of code (which create and add the SKSpriteNode) with the following:
node.starType = type var sprite: SKSpriteNode if type == .Special { sprite = SKSpriteNode(imageNamed: "StarSpecial" ) } else { sprite = SKSpriteNode(imageNamed: "Star") } node.addChild(sprite) |
First we set the star type. Then, we check the type when creating the sprite to add the appropriate image.
It remains only to specify the type of star when creating it. In the init (size 🙂 method of the GameScene.swift class, find the line in which we call createStarAtPosition and change it as follows:
let star = createStarAtPosition(CGPoint(x: 160, y: 220), ofType: .Special) |
Assign StarType.Special to our star.
Build run. Our star turned pink! Later we will add a scoring system and the differences in star types will become clearer.
Ringing! Adding a sound effect
It would be nice if the collision of the hero with the star was accompanied by a sound signal. Download the star sound effect from here and drag the file into our Xcode project. Make sure the “Destination: Copy items if needed” option is selected and the UberJump target is selected.
Sprite Kit uses SKAction to play sounds. Open GameObjectNode.swift and add the following property to the class above StarNode:
let starSound = SKAction.playSoundFileNamed ("StarPing.wav" , waitForCompletion : false) |
Now it remains only to reproduce the sound effect during the collision of the hero with the star.
In the collisionWithPlayer () method of the StarNode class, replace self.removeFromParent () with:
// Play sound runAction (starSound, completion : { // Remove this Star self.removeFromParent() }) |
The code starts SKAction, plays the sound file, and removes the star when the action is over.
Build and run. As soon as the hero’s sprite hits the star, you will hear a ringing sound.
Game objects: platforms
Our next task is to add a platform. We will create a new subclass of the GameObjectNode class for the platforms. As with the stars, we need two types of platforms: one type of platform must be indestructible, and the others must disappear the moment the hero jumps off them.
In GameObjectNode.swift, add the following collection above the GameObjectNode class definition to define two platform types:
enum PlatformType : Int { case Normal = 0 case Break } |
Next, we need to create a PlatformNode class. Add the following code to GameObjectNode.swift:
class PlatformNode: GameObjectNode { var platformType : PlatformType! override func collisionWithPlayer(player: SKNode) -> Bool { // 1 // Only bounce the player if he's falling if player.physicsBody? .velocity.dy < 0 { // 2 player.physicsBody? .velocity = CGVector(dx: player.physicsBody!.velocity.dx, dy: 250.0 ) // 3 // Remove if it is a Break type platform if platformType == .Break { self.removeFromParent() } } // 4 // No stars for platforms return false } } |
Let’s take a closer look at this code:
1. In accordance with the game scenario, the hero’s node should bounce off the platform only when it falls, that is, when it has a negative dy value of its velocity (velocity property). This check also prevents the hero node from crossing the platforms as it moves up the screen.
2. We tell the hero’s node an upward speed so that it bounces off the platform. This is done in the same way as we did earlier for the stars, but with a lower value. The stars are cooler, aren’t they?
3. If the platform is of the platformType.Break type, then we remove it from the scene.
4. The ultra jumper does not gain points when he jumps off the platform or when he jumps on it, so there is no need to update the HUD.
To add a platform for the scene, open GameScene.swift and enter the following method:
func createPlatformAtPosition (position: CGPoint, ofType type: PlatformType) -> PlatformNode { // 1 let node = PlatformNode() let thePosition = CGPoint(x: position.x scaleFactor, y: position.y) node.position = thePosition node.name = "NODE_PLATFORM" node.platformType = type // 2 var sprite: SKSpriteNode if type == .Break { sprite = SKSpriteNode(imageNamed: "PlatformBreak" ) } else { sprite = SKSpriteNode(imageNamed: "Platform" ) } node.addChild(sprite) // 3 node.physicsBody = SKPhysicsBody(rectangleOfSize : sprite.size) node.physicsBody? .dynamic = false node.physicsBody? .categoryBitMask = CollisionCategoryBitmask.Platform node.physicsBody? .CollisionBitMask = 0 return node } |
This method is very similar to createStarAtPosition (_: OfType :), but note the following main points:
1. We create an instance of PlatformNode and set its position, name and type.
2. Select the appropriate image for SKSpriteNode depending on the platform type.
3. We create the physics of the platform, including the type of collisions.
Now, to add a platform, paste the following code into the init (size 🙂 method, just before the line that creates the star:
// Add a platform let platform = createPlatformAtPosition(CGPoint(x: 160, y: 320), ofType: .Normal ) foregroundNode.addChild(platform) |
Build and run the game. Click to start and watch the Hero Sprite energize from the star and then bounce on the platform!

Where to go next?
Fine! As you can imagine, making a game like Mega Jump is not that difficult. With Uber Jump, we learned all the basics that we can use further on our way to making a great game.
At the end of the article, you can download the Xcode project containing everything we learned in this course.
In the next part we will use the accelerometer to control the movement of the hero along the X axis. We will also load a number of properties from an external plist file and add a scoring system. A lot of interesting things are yet to come.
If you have any questions, thoughts or suggestions for future lessons, please leave your comment below.
Continued in a week ….
Download Xcode Source.
Download graphic resources for the lesson.