
Today the subject of the article will seem to be a simple, but not always clear topic. After all, I am sure that when you just bought yourself iPhone, you immediately started using it to the maximum: play games, surf the Internet and take pictures. And so you took a bunch of pictures, connect your device to your computer and … You get a little lost, as iTunes comes out and wants something from us. But we just need to transfer photos from iPhone to the computer. Let's see, everything is really simple.
I will consider transferring photos from iPhone to a computer on two different systems: Windows and OS X, as they do it in completely different ways. Let's start with Windows.
It should be noted right away that the reverse process of transferring a photo from a computer to iPhone is radically different from what is described below. This is due to the creation of additional service files on the device. For more details, read the instructions on how to upload a photo from your computer to iPhone.
How to transfer photos from iPhone to computer in OS Windows
Before transferring the photo from iPhone to the computer, we need to find a USB cable.
Further, in order to transfer photos from iPhone to Windows, you need to do the following steps:
- We connect the device to the computer using our USB-wire.
You can open the device immediately after detection, you will see the Windows Explorer window, which will offer you a number of actions that you can do. We select “Open device for viewing files”.
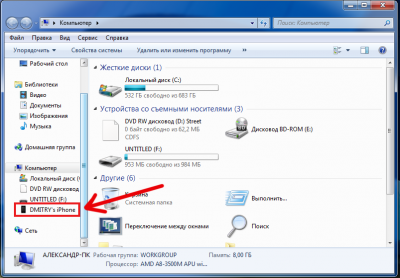
- Also, when the computer “sees” our iPhone, then in the “My Computer” section, in the left column under the list of your displayed hard drives, your device will be displayed by the name you awarded iPhone when setting up in iTunes. It will appear as a media device, with its own camera icon. If for some reason you did not open the device with the item above, then you can do it now by clicking on it with the mouse.
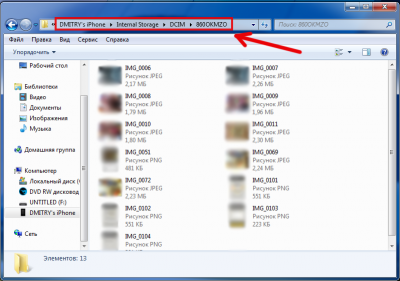
- By double clicking on the icon of our new media device, we get to … List of our photos? And still not – we find ourselves in the folder in which “Internal storage” is displayed. Click on it twice, then on the “DCIM” folder and then on the specific folder for each name (I have it “860OKMZO”). Now we see our photos!
- Well, now we select the photos that we want to transfer to the computer and drag the necessary photos (or a group of several), for example, into some specially created folder or an existing one
- That's it, the photos have been moved!

Note to the hostess. Sometimes the PopUp window that opens every time you connect iPhone to your computer is very annoying. Here's how to turn it off.
How to transfer photos to OS X
Everything is very simple here, because, of course, Apple thought about this question about a bunch of their own devices.
Method 1: standard
interesting 6.1-inch iPhone 12 and iPhone 12 Pro will go on sale first Now officially: announcement of iPhone 12 will take place in a week
Again, before transferring photos from iPhone to computer, prepare a USB cable.
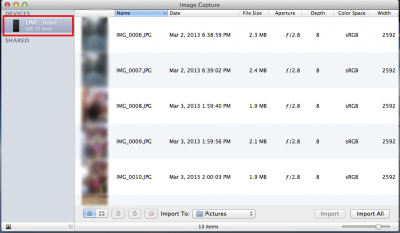
We need the “Image Capture” program, which is included in the standard applications in OS X. It is located in the “Programs” section. You can also find it through the in-system Spotlight search engine (called by simultaneously pressing CMD + Space).
- We connect the device to the Mac.
- The system should immediately notice the device and itself should open the “Image Capture” application (if this did not happen, I wrote above how and where it can be found).
- You will see a list of photos of your device. All that remains is to drag the selected photos to your desktop / folder.
- All is ready!
Method 2: non-standard
Since not everyone and do not always use standard official methods, or maybe there is simply no necessary program at hand, here's how you can transfer a photo from iPhone to your computer using one of the file managers. For example iTools.
- We go into the program.
- And we follow the path DCIM / 100APPLE.
- All files that you see are your photos / videos / screenshots. Screenshots and photos will have three letters at the beginning of the file – IMG, and the video, respectively, VID.
- Now we repeat the discussed procedure more than once – drag it to the desktop / folder.
- That's all! Photos have been moved!

Now you can easily transfer all your photos and more! Good luck!
Method 3: non-standard
Another way to transfer photos from iPhone to your computer. This time without connecting to a computer at all. This is done through a shared folder in the Yandex.Disk cloud service.
A huge plus of this method is that photos can be dropped from any place where there is Internet. And these photos will be available even when iPhone is disabled.
This method is described in more detail in the instructions for transferring files to iPhone.