
Good day, dear readers!
I am sure that everyone had such a situation when you bought yourself a new and long-awaited model iPhone, transferred all contacts, and are already ready to go, but suddenly one small misunderstanding arises: you have already thrown off all videos and photos from the previous device, thinking just to transfer them to the device through the computer.
But it was not so – yes, the phone is understood by the computer as a media device, you can transfer a photo from it to a computer, but transferring a photo to iPhone will not work – it is not allowed. “So how do I transfer all photos or videos to my new iPhone?” – you ask? Yes, everything is simple as always, dear friends, let's figure it out.
There is, of course, more than one way to add photos to iPhone: the so-called “official” and “unofficial”. Let's consider both methods.
Method 1: official
To upload photos to iPhone from your computer, you can use Apple's iTunes Media Combine. This application is installed by almost every owner of a mobile device from the company Apple. If not, download it for free from here: apple.com/en/itunes/download/
So, first we need to prepare all the photos and videos. But no, you don't need to convert anything, just transfer the folder with the files to your desktop or remember the path to the folder in which they are located on your system. The point is that iTunes can only transfer images from one folder. Made? – great, then let's start.
- Step 1. Connect your mobile device to your computer using a cable.
- Step 2. Launch iTunes.
- Step 3. Go to the page with the connected gadget.

- Step 4. In the sidebar, select the Photos tab.
- Step 5. It is necessary to mark the 'Synchronize' item and select the folder from which iTunes will copy the images.
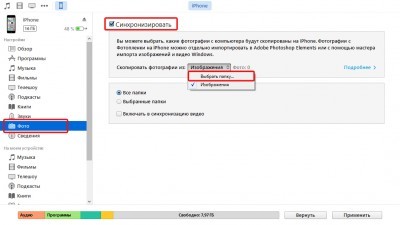
If the source of images will be the new Photo application, which recently replaced iPhoto on the platform OS X, users will be able to synchronize images from individual albums or transfer only selected images to the memory of a smartphone or tablet.
- Step 6. Click on the “Apply” button
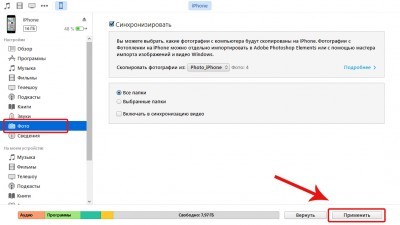
After these manipulations, a new album with the name of the synced folder will appear in the Photos application at iPhone. That's all!
The disadvantage of this method is that the application allows you to transfer pictures that are stored in only one folder on your computer.
Method 2: cloud storage
In addition to iTunes, you can upload photos to iPhone using various cloud storages. For example, such as Dropbox, Google Disk, Yandex. Disk and others. All popular services have their own applications for iOS, which allow you to manage files stored in the cloud.
Upload photos with iCloud
If you want to use iCloud, download the desktop app from apple.com/en/icloud/setup/pc.html.
- Open the app. Log in with your Apple ID. Go to Photos, select the images you want.
- The images will automatically move to the cloud storage.
- Open the Photos app at iPhone. All Images must be there. It is important that you have the function of syncing photos from iCloud enabled in the iCloud settings.
This method is somewhat more convenient than downloading photos using iTunes. First, there is no need for a cable. Secondly, all images are stored in the cloud, so they can be accessed from any device.
Uploading photos using Yandex.Disk
Create an account on Yandex.ru if you don't have one yet. Open Yandex Disk in your browser (as an option, you can also download the client program to your computer). Upload the photos you want to Disk.

interesting 6.1-inch iPhone 12 and iPhone 12 Pro will go on sale first Apple has developed two types of masks to protect against coronavirus
Install the Yandex.Disk mobile application on iPhone. Log in with your account and open the folder with your saved photos.


Open the one you need and click on the arrow icon in the upper right corner of the screen. In the menu that appears, click “Save to Gallery”. The photo will be saved in the photo gallery iPhone.


Now open the Photos app. Here you will find the uploaded photo.


Yandex.Disk also has the ability to save files for offline viewing when the Internet is not available. But there are more options in the native Photos app.
I find this method the most convenient.
Through the cloud service, you can not only upload photos to iPhone, but also in the opposite direction, transfer photos from iPhone to your computer.
Method 3, pluggable flash drives
In addition to all of the above, various accessories can be used to transfer images to the memory of a mobile device. However, you should immediately prepare for the fact that such solutions will be quite expensive.
You can choose between two classes of devices – relatively compact flash drives and fairly large gadgets that combine the functions of a drive and a router.
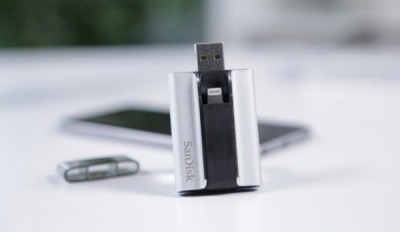
One of the most famous representatives of the first category is the SanDisk iXpand – a flash drive with USB and Lightning connectors ranging from 16 to 128 GB. Thanks to the presence of two ports, users can move large amounts of data between different platforms.
For the SanDisk iXpand to work with iPhone and iPad users will need to install a small application. With its help, the owners of apple gadgets can view documents, play music files, copy data, etc.
Prices for the SanDisk iXpand start at $ 60.
Method 4: informal
In order to transfer a photo to iPhone, iTunes is not always required. Yes, you can achieve your goal using various programs, for example, download photos via Facebook, having previously posted them on this social network.
But we will look at it in such a way that you only have a phone with a jailbreak installed, a computer, a wire, a photo / video and the desire to see the latter in the first. We need one of the file managers to choose from. I will show it using iTools as an example, but you have the right to choose whatever you want, we only need basic functionality.
- Step 1. Connect your phone to your computer using a USB cable.
- Step 2. Now we need to go to our file manager. We do it.
- Step 3. Now go along the path / var / mobile / Media / DCIM / 100APPLE.
- Step 4. Do you see any IMG_ / VID_ files there? Or don't you see anything? In the first case, you should definitely see the files, if you have already taken a photo / video on iPhone, and in the second case, either you have not taken a photo / video or entered the wrong place – check everything again. Accordingly, all the files that you see are our photos / videos that we managed to make on iPhone.
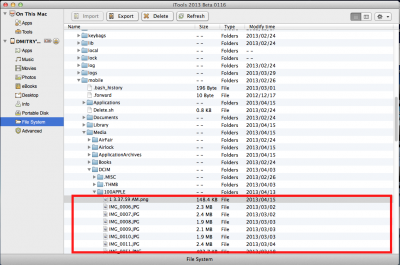
- Step 5. Now just go to our photo folder, select all the files (in Windows – CTRL + A, in OS X – CMD + A) and drag them to the folder area into which we went to the file manager.
- Step 6. We are waiting for the transfer to complete and rejoice – now all the desired photos / videos are on your phone!
I want to clarify something else. By syncing via iTunes, the quality of photos will be reduced. Yes, unfortunately there is no way to turn it off. But you can avoid this by choosing the second method, because everything is done directly in it. But a jailbreak is needed. In general, the choice is yours anyway.